Tech_Marco wrote:
There are 3 different way to set the Origin: Software, Key, and the machine
Software: It follow whatever image location appears on LaserCad
I've tried to figure out what this one is doing, it doesn't make much sense. My test file in LaserCAD is simple: I draw a 10mm x 10mm box whose upper left corner is at (100,100) relative to the canvas. When I run this job, the box isn't anywhere near where I expect it to be. I expect the box to be cut 100,100 from somewhere.
Key: You move the laser head to whatever point you want to be the Origin, then press the button "Origin" and the machine pick that spot as origin even though after Reset is press
This is the most useful one to me. My DSP is set to "Key".
I expect pressing "Origin" on the DSP to set the point that corresponds to (0,0) on the drawing surface in LaserCAD.
I believe the issue is related to the little blue diamond that LaserCAD shows - This appears to be the software origin, and it is calculated to be the upper-left-most part of the figure to be cut. I would like to know how I can make that blue diamond always be at (0,0). Today I do this by adding a Pen Run around my figure.
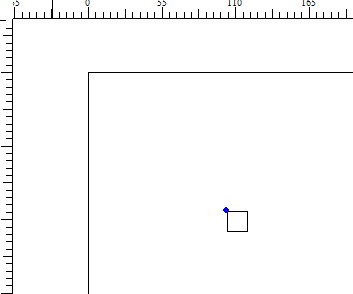
Hopefully this will illustrate: When I create a new figure and put in my box, here is what I see in LaserCAD:

- 10mm square at (100,100)
- WeirdOrigin.PNG (2.52 KiB) Viewed 4467 times
The blue diamond seems to be the figure's origin. I will call this the "origin dot."
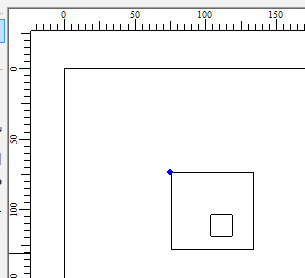
If I add another figure, the "origin dot" moves along with it.

- new rectangle, new origin dot
- WeirdOrigin2.PNG (2.98 KiB) Viewed 4467 times
What I want is for the origin dot to be at (0,0).
When I do a project, I am sometimes lasering onto an existing workpiece that has its datum in the upper left corner. The figures to be lasered are NOT at this location, but the workpiece is. So, if I want to laser a hole at some exact coordinates on my workpiece, I would like one corner to be the datum. The workflow would be:
- Draw the holes onto LaserCAD where I want them to be relative to (0,0). (for example, by importing a DXF from a CAD model).
- Install workpiece onto the laser, jog to the corner and press ORIGIN. Now the origin corresponds to the (0,0) on LaserCAD, which corresponds to the datum in the CAD model.
- Run the job.
Current software will assume that the left/top most piece of whatever is being lasered is the origin.
Unless of course there's some way to move that blue diamond to (0,0). Today I can easily do this by just putting some figure at that location, like a pen run.
I hope this makes sense, it's not easy to explain.
The front panel is my design. It intentional move the Z+/Z- from the top/bottom to the Right as I feel that it made more sens. All menu key are different thant the AWC708C and thanks to Li allow me to do the change. He is working on a custom copy of LaserCad for my X7. Once it is completed, only X7 can take advantage of new features in the future. Some guys who spent $100 less buying from China will not be able to use the new LaserCad. It is a way to protect me from my competitors. Advance version may need a dongle (security USB lock)
Well, as I said before, I like the button layout, the speed of the LCD, and the clear English text. Very nice. I'll be happy to keep updating my X7.
/Mitch.