LOG: D40/K40 Major OverHaul, DSP Upgrade(NEWB Questions Ans)

rushmore1305
Posts: 81
Joined: Sat Jul 20, 2013 9:19 pm
Contact:

Re: Rookie at Laser, NEED stupid questions answered

Post by rushmore1305 »

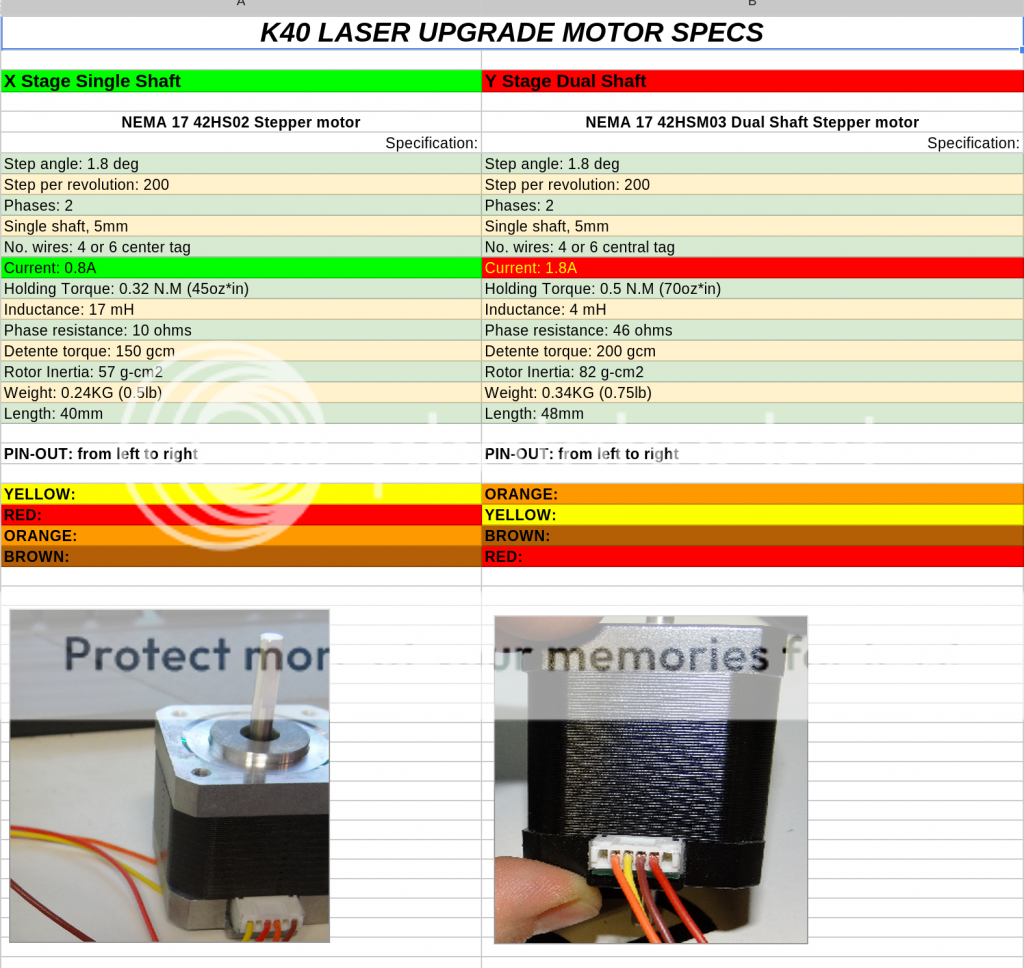
sorry about the above post if it is confusing, i had made an easier to read picture, which i will update upon recieving the info, i think its a cool picture to have for any DIY laser person, makes all your motor specs right there

Here is the actual GOOGLE Sheet, for the picture below
https://docs.google.com/spreadsheet/ccc ... sp=sharing

Image


OH MAN, i just noticed something , i really really hope is not a huge mess up on my part and you were probobly busy and did not notice that either

see the AMP on the Y STAGE IS 1.8 but the M415B Microstep Driver that you had shipped me with the DSP upgrade kit only go up to 1.5A
please tell me im not understanding something corectly, or did i just pretty much buy a useless motor in my case
Tech_Marco
Posts: 4654
Joined: Mon Jun 15, 2009 3:00 pm
Contact:

Re: Rookie at Laser, NEED stupid questions answered

Post by Tech_Marco »

http://www.lightobject.com/NEMA-17-42HS ... -P723.aspx
Wire connection:
Yellow and Orange in pair to A+ and A- on stepping motor
Red and Brown in pair in part to B+ and B- on stepping motor

http://www.lightobject.com/NEMA-17-42HS ... -P747.aspx
Wire connection:
Orange and brown in pair to A+ and A- on stepping motor
Yellow and red in pair in part to B+ and B- on stepping motor

Hope this help... :lol:
rushmore1305
Posts: 81
Joined: Sat Jul 20, 2013 9:19 pm
Contact:

Re: Rookie at Laser, NEED stupid questions answered

Post by rushmore1305 »

Tech_Marco wrote:http://www.lightobject.com/NEMA-17-42HS ... -P723.aspx
Wire connection:
Yellow and Orange in pair to A+ and A- on stepping motor
Red and Brown in pair in part to B+ and B- on stepping motor

http://www.lightobject.com/NEMA-17-42HS ... -P747.aspx
Wire connection:
Orange and brown in pair to A+ and A- on stepping motor
Yellow and red in pair in part to B+ and B- on stepping motor

Hope this help... :lol:

nice i am going to try it out right now, got any insight on the UM settings and the what should the Microstepper be set at on the driver?
rushmore1305
Posts: 81
Joined: Sat Jul 20, 2013 9:19 pm
Contact:

Re: Rookie at Laser, NEED stupid questions answered

Post by rushmore1305 »

ok
man i am getting so frustrated with this again, once again, nothing is moving, and i did the wiring and everything to your specs,
last thing is to check these settings, can you please look them over and tell me if i am doing anything wrong

Image
rushmore1305
Posts: 81
Joined: Sat Jul 20, 2013 9:19 pm
Contact:

Re: Rookie at Laser, NEED stupid questions answered

Post by rushmore1305 »

Major BreakTHrough, Motors are now Turning, even stop when i hit the limit switches, now time assemble the xy rails, unfortunatly i am not going to be able to use the motors on the Y axis, because its a little bit longer then the chineese one, and it does not have the proper notch to secure the rod that goes parrell to the X axis.
i will post pictures once i get the new motor modified to work on this, the motors from LightObject, are far more superior to the crap that it came with, but for now ill settle for one motor upgrade and in a couple of days upgrade the other, it will give me a chance to test out this xy rails and how they move, because i am thinking about doing some improvements but we will see, dont want to rush in front of the train.

but i am super excited, and want to thank the most to all Lightobject crew and especially Marco, i now am 100% confident all the issues i will have will be caLIBRATION AND SOFTWARE, which i will deal with, i just cant stand dealing with Hardware issues because i like everything perfect
rushmore1305
Posts: 81
Joined: Sat Jul 20, 2013 9:19 pm
Contact:

Re: Rookie at Laser, NEED stupid questions answered

Post by rushmore1305 »

Quick Question.

Motors are REVERSED, meaning the go to the right buttom instead of top left, where i set limit switches.

i know i could just reverse the AB+/- connections on the stepper drivers, but i am wondering is it possible to do this VIA software?
Tech_Marco
Posts: 4654
Joined: Mon Jun 15, 2009 3:00 pm
Contact:

Re: Rookie at Laser, NEED stupid questions answered

Post by Tech_Marco »

rushmore1305 wrote:Quick Question.

Motors are REVERSED, meaning the go to the right buttom instead of top left, where i set limit switches.

i know i could just reverse the AB+/- connections on the stepper drivers, but i am wondering is it possible to do this VIA software?

You can change the direction of motor or the Key using the LaserCad. All should be mentioned in the manual


Marco
rushmore1305
Posts: 81
Joined: Sat Jul 20, 2013 9:19 pm
Contact:

Re: LOG: D40/K40 Major OverHaul, DSP Upgrade(NEWB Questions

Post by rushmore1305 »

OK, now Project is Fully Operational and Calibrated NOW, it is not finished, as there is still a lot of little modifications i would like to do to better it, as well as get another microstepper for the Z bed, but all in all i am very very impresed by the DSP, it has turned the K40 from rags to riches :)

I could not express my gratitude for all the help from Marco and the rest of the LightObject Community, without your help i could not even begin to assume that i could undertake something like that.

here is are my first cuts,

i cut out letters RushMore and was going to glue them to my little prototyping board, but i broke letter U in the process so now it just says RM lol

then cut a little tag for my Daughter, the resolution is Unbelievable.

I have to read around the forum to see what Power and speed you guys are running when cutting acrylic, just to make sure im not overpowering the laser,
those cuts were made at the speed of 15 and power of 55%
that is not so bad right? i had to do two runs, just to be safe, i was not sure it cut all the way through the first time, but Man this thing just has the most perfect repetition i have ever seen.


Image
Image
Image
rushmore1305
Posts: 81
Joined: Sat Jul 20, 2013 9:19 pm
Contact:

Re: LOG: D40/K40 Major OverHaul, DSP Upgrade(NEWB Questions

Post by rushmore1305 »

Oh i also forgot to mention what i think is very important, when i was asking that my motor directions were going the oposite ways on both axis, i did attempt to switch it in the LaserCAD Software. but for some reason the motors instead started going a completely different directions. it was weird, so i did swap the cables around, and i will post pictures tomorow of the exact layout, but the motors not only went the right way but for some weird reason the whole set up got a lot smoother, not only in a sound aspect of it but in the way the motors performed, like the vibration they gave out got to be a lot less.

and before i swapped the wires the limit switches for some reason did not read properly, now everything is smooth its crazy, the switch is berely pressed and Bam the machine stops and moves itself out 1-2mm, thats how i have it set up.
rushmore1305
Posts: 81
Joined: Sat Jul 20, 2013 9:19 pm
Contact:

Re: LOG: D40/K40 Major OverHaul, DSP Upgrade(NEWB Questions

Post by rushmore1305 »

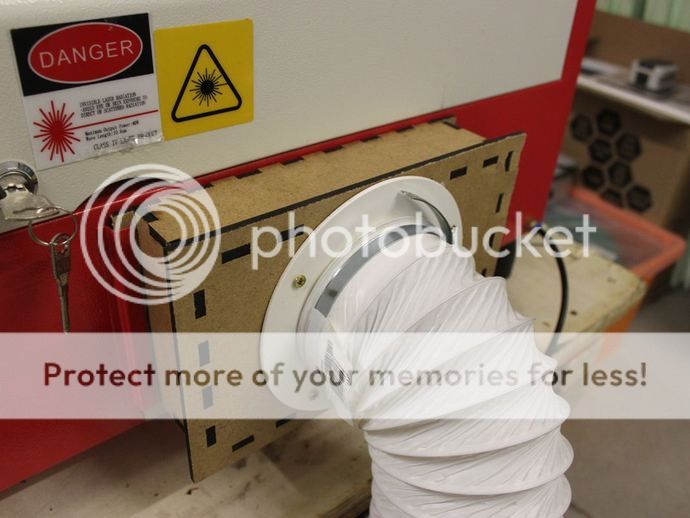
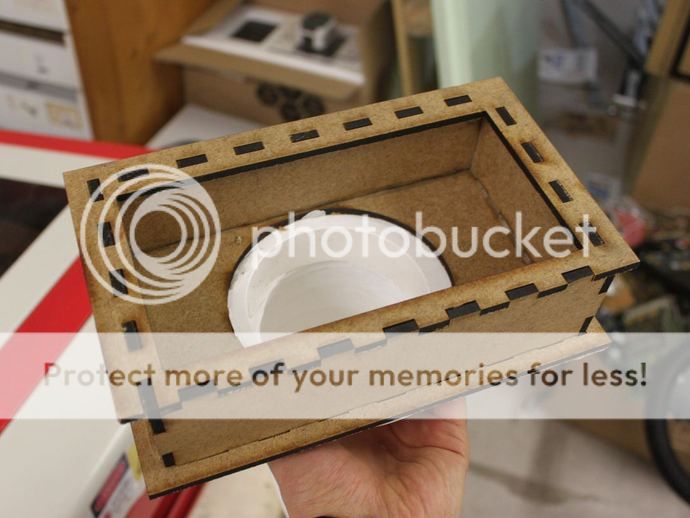
So here I think I'm going to upgrade my exhaust plate
Image

Image
waltfl
Posts: 674
Joined: Thu Sep 08, 2011 5:29 am
Contact:

Re: LOG: D40/K40 Major OverHaul, DSP Upgrade(NEWB Questions

Post by waltfl »

hi rushmore
good thinking but don't use any of the corrugated vent hose and nothing from plastic because the corrugation collects to much dust and it could build a fire without that you realize it before it is to late.
better use metal elbows and pipes from A/C duct system and a good exhaust fan with at least 500CFM like inline from hydroponic.
greetings
waltfl


rushmore1305 wrote:So here I think I'm going to upgrade my exhaust plate
Image

Image
Tech_Marco
Posts: 4654
Joined: Mon Jun 15, 2009 3:00 pm
Contact:

Re: LOG: D40/K40 Major OverHaul, DSP Upgrade(NEWB Questions

Post by Tech_Marco »

Congradulation! How you feel now? Did you remember what I told you before? During the procesing of upgrading, you would encounter so many issues and many times you may got frustration. But once you overcome it, it is considered a major break through of each problem solved. And now, you should be proud of yourself being able to complete the proejct. My tears off for you, great job! ;)

When will you have your 'gradulation' ceremony?

Marco
rushmore1305
Posts: 81
Joined: Sat Jul 20, 2013 9:19 pm
Contact:

Re: LOG: D40/K40 Major OverHaul, DSP Upgrade(NEWB Questions

Post by rushmore1305 »

Hahaha, i am not sure if you are making fun of me or not, but its truly how i felt, i felt like it was a major achievement, considering that i pretty much rebuilt the whole machine, i am very proud of myself, and what i am even more proud of is how everything works perfectly once these tiny details got worked out,

Its true, if you follow these guys lead you will end up with some of the best working equipment around.
i am very excited to be part of the what i consider Elite group of people who own the best Laser Controllers, i am sure there is bigger and better stuff out there but for what a person as a hobby/ small business, you could not for ask any more.

Now for the next two month i will fine-tune and brush up on all my Engineering Design skills, plus learn in depth about physical properties of acrylic and plywood, and once i am comfortable i will sell my DSP K40 and Start on a either 900 x 600 mm or 600 x 400 mm depending on how these two month play out. Mainly all replies on the what my community/ customer base will request as per the item size they would like to create, for me the larger is better, but if i have only 10% of people requiring larger stage, then it is not Cost Effective nor reasonable for me to have anything like that, especially how huge it is.


Also would like to Show the now 100% Fully Functional, Mirrors and Lens Aligned and running at Perfect Power, just overall to my standard Superb Laser Machine, this is no longer a "Cheap Chinese Laser Engraver", this is a "40 watt DSP Laser CUTTER"

Now i am sure everyone here is just like me, so you know that this is still far from over, all though the machine is fully functional, i am going to better it
this Monday to be completed:
1.Z-Bed Control via DSP controller
2.Upgrade the Focus Lens to the best one Light Object sell with 68.5 mm focus distance.
3.Upgrade the Smoke Exhaust System to a much better specialty Exhaust Fan that will be located outside with over 250 CFM, also install the new bracket for the exhaust on the laser which will allow to access the Laser compartment and create an air tight seal around the bracket with Silicone
4. Install the New Air Assist Silicone Line that is a lot larger and better flexing tube, more commonly used by everyone, the line i am using right now is way small making my little pump overheat (mainly because i don't have the proper connector to go to the regulator so i have to go straight to pump, but all that resolved once receive the new tubing)

Outstanding Things/Issues to be Purchased/Brainstormed on Monday:

1. Work on Better Laser Cooling System:
a.) Rewire the Liquid Cooling Tower(works fine as is, but the wiring was sloppy and used terminal with just bare wires, i have Crimp on adapters for the wires for those terminals. just make the whole set up much cleaner looking and eliminate accidents with Shorts or anything like that.
b.) Relocate the Temperature Read-out to the main Control Door(where the DSP Remote is connected to and emergency shut off,pictured below).
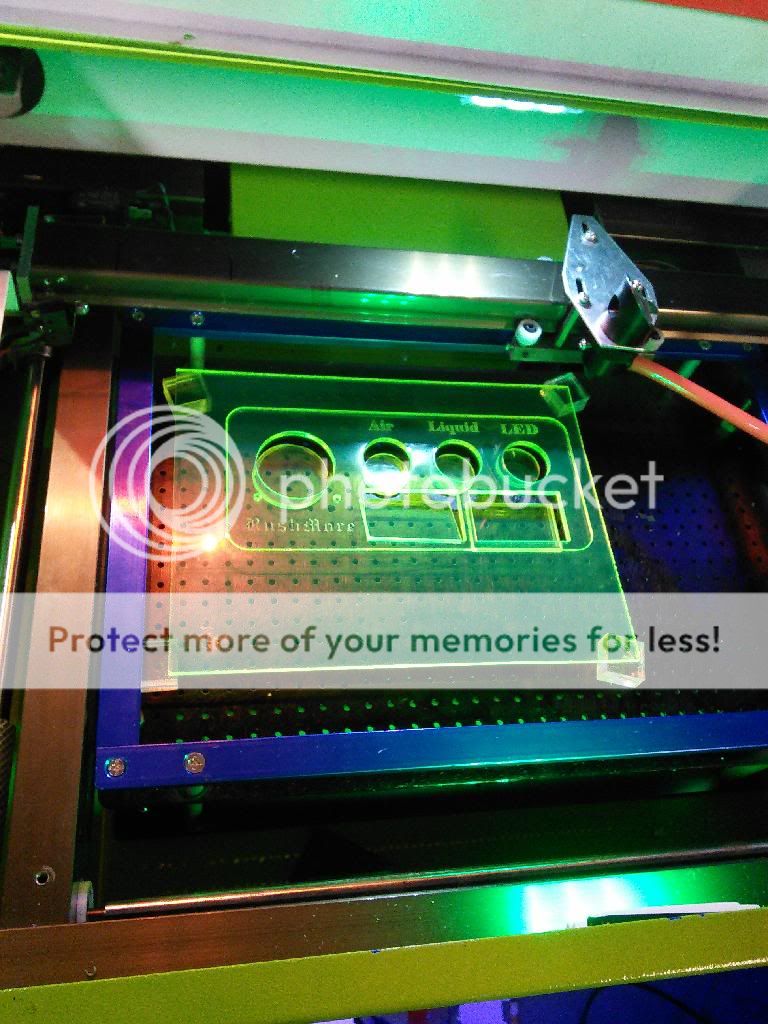
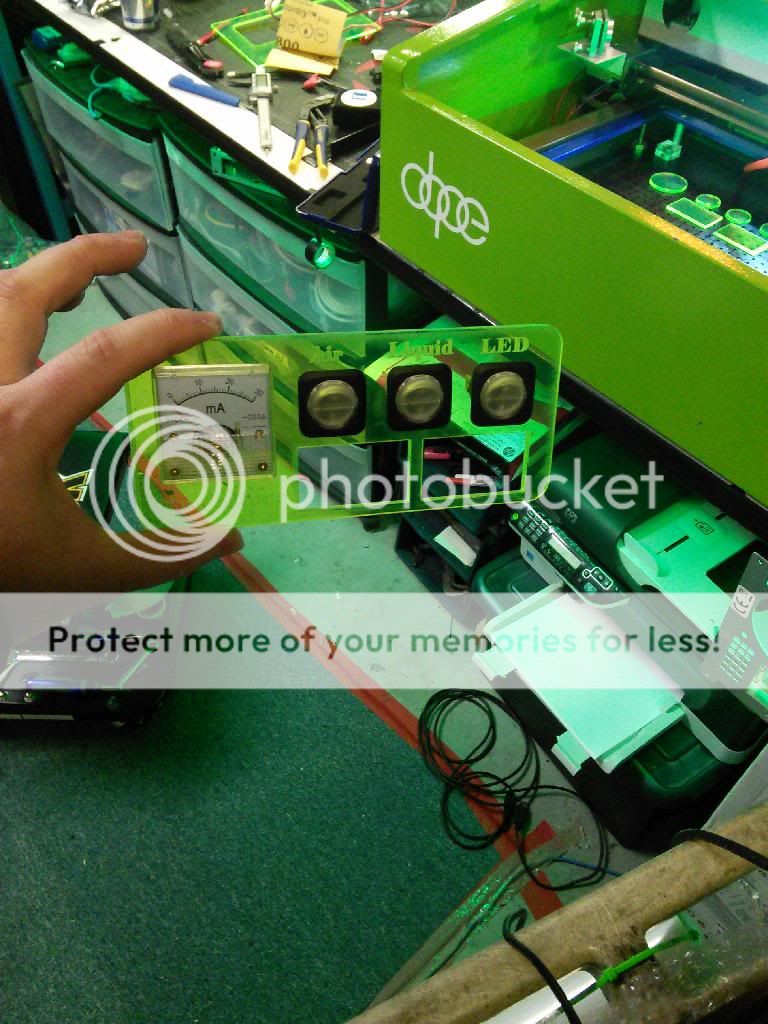
c.) Relocated all Three Liquid Cooling Switches to the Main Control Door. that way all the needed safe features are in one location, so that if anyone ever uses the machine that will be in front of everything they possibly need.
d.) Create a new Plate to Lay on top of the Main Control Door with nice rounded edges, because the new DSP remote bracket that i just cut is under the door because our metal is already nicely cut, i am not going to be able to get it as nice so i will make my acrylic nice, and what ever is under it, i can butcher to pieces, if you know what i mean. now depending on my drawings of how much room all this craziness is going to take i might add these two digital voltage meters make sure that my power supplies are not acting up at any point, add one for the motor power supply which is the 24 V, and then my water cooling set up is on a separate 12 V power unit, since i already have the little digital screens why not, throw it in there.
2. Install the Analog mA meter that originally came with the "cheap k40 Chinese laser engraver". Mainly doing this as a piece of mind for security knowing that i am at no point going to be doing harm to the laser, and who ever is around it.
3. Order two of the best 18 - 20 mm Reflection Mirrors from Light Object, after attempting to clean the mirrors with Alcohol today, i discovered that Mirror 1( closest to Laser Tube) has a huge burn mark almost smack in the middle of itself, i was unable to remove it, then had a buddy come look at it and he too came to conclusion that should be replaced. so might as well replace all three, and just buy one standard one, so when i do sell this laser i can sell it with the original mirrors but in perfect condition, because the other two mirrors might as well be brand new.
4. Finally last but not least start thinking about the mounting of the Honey Comb design, that i abandoned in the very begging of me getting into the laser machines. right now 15mm stand offs work great but it will be nice not to have the cut fall out incase i still want to engrave something


Image

Image

Tech_Marco wrote:Congradulation! How you feel now? Did you remember what I told you before? During the procesing of upgrading, you would encounter so many issues and many times you may got frustration. But once you overcome it, it is considered a major break through of each problem solved. And now, you should be proud of yourself being able to complete the proejct. My tears off for you, great job! ;)

When will you have your 'gradulation' ceremony?

Marco
rushmore1305
Posts: 81
Joined: Sat Jul 20, 2013 9:19 pm
Contact:

Re: LOG: D40/K40 Major OverHaul, DSP Upgrade(NEWB Questions

Post by rushmore1305 »

Update:
Received the 68.5mm Focus Mirror ZnSe for $55.
Although I jumped the gun and bought it before getting some more info. I have to say I an extremely happy with the improvement.

I can now cut 3mm acrylic at 60-50% power and 7mm speed.

The Reason I say I jumped the gun is because I got schooled today and understood that larger focus distance is intended for thicker materials.

I will be purchasing the 50.8mm Focus Lens shortly.
At the same time it's nice to have a variety of lenses to learn on as some pointed out.

But the overall quality of the cut in my option is night and day with the stock one compared.

I can only imagine how much better things are going to get with the all New High End Mirrors.

Started working on the second interface plate for the laser which will be on the same door as DSP LCD

Here is how it looks.

I'm just waiting to get my two Temp Read outs. One for Liquid temp and one for Ambient

Image
Image
Tech_Marco
Posts: 4654
Joined: Mon Jun 15, 2009 3:00 pm
Contact:

Re: LOG: D40/K40 Major OverHaul, DSP Upgrade(NEWB Questions

Post by Tech_Marco »

You're the man, from new baby to now an expert!
gi_saluting.gif
gi_saluting.gif (29.91 KiB) Viewed 5228 times
Marco ;)
Post Reply

Return to “D40/K40 small chinese CO2 laser machine”

Who is online

Users browsing this forum: No registered users and 4 guests