Do not install the 64bit driver if you're running 32bit windows. This applies for XP and Win7, not just Win7. If you have 4GB of RAM or over, then you're most likely running 64bit, and if you aren't, you should be.waltfl wrote:Hi tim
what version of computer you are using ? if you use XP then the driver is allready inc;luded in the download and comes up during installation if you using win7 then you need to download the 64 bit driver extra and install them before you install lasercut.
Need help with getting setup properly.
-
Things
- Posts: 96
- Joined: Sat Mar 17, 2012 7:08 pm
- Location: Cairns, Australia
- Contact:
Re: Need help with getting setup properly.
-
twosoc
- Posts: 90
- Joined: Fri Jun 29, 2012 2:13 pm
- Contact:
Re: Need help with getting setup properly(update limited suc
hey all, I'm running xp 32bit, will try to locate drivers or reinstall them. I have had some success in getting it to work properly, I had a bit of time to play about with it yesterday and this afternoon, and have installed and got the limit switches working, I splashed out an extra £2 and got switches for both ends of the travel, so the gantry can't crash into either end of the table if something goes horribly wrong.
I think this fixed the erratic behaviour. Thinking about it it makes sense, if the head hits the limits and they aren't working it will continue to turn the motor, thus making it think its now 100mm (or so) to the left of where it actually is, therefore throwing the location out of whack. thats my theory anyway, it may not work like that but it sounds likely, as they're now working properly and its seemed to have solved the problem.
I had to set the steppers higher than I'd anticipated to about 1200 but it seems to have eliminated the juddering and horrendous noise and seems quite smooth now. I managed to get the 50x50mm box drawn and the cut box measured 50x50, is this the right setting? I hope so as whenever I send the job to start, it follows the line fine but the laser doesn't fire. It fires when the cut box is running but nothing for the start. I still have the voltmeter connected so I can tell thats its not outputting anything, and isn't just set too low. I'm off to search the rest of the forum for ideas.
Tim.
-
waltfl
- Posts: 674
- Joined: Thu Sep 08, 2011 5:29 am
- Contact:
Re: Need help with getting setup properly(update limited suc
Hi tim
nice if you finally got something working.
the settings for the stepper are not clear how you set to 1200 steps??? I only know 1600 .ether way is fine.
you need a minmum of 10% usually for the laser to fire below them the laser does not fire. set the power
a bit higher
check the water protect and all the wire connection also check the setting manufacturerre is it set to glas tube ,
low TL
greetings
walt
twosoc wrote:hey all, I'm running xp 32bit, will try to locate drivers or reinstall them. I have had some success in getting it to work properly, I had a bit of time to play about with it yesterday and this afternoon, and have installed and got the limit switches working, I splashed out an extra £2 and got switches for both ends of the travel, so the gantry can't crash into either end of the table if something goes horribly wrong.
I think this fixed the erratic behaviour. Thinking about it it makes sense, if the head hits the limits and they aren't working it will continue to turn the motor, thus making it think its now 100mm (or so) to the left of where it actually is, therefore throwing the location out of whack. thats my theory anyway, it may not work like that but it sounds likely, as they're now working properly and its seemed to have solved the problem.
I had to set the steppers higher than I'd anticipated to about 1200 but it seems to have eliminated the juddering and horrendous noise and seems quite smooth now. I managed to get the 50x50mm box drawn and the cut box measured 50x50, is this the right setting? I hope so as whenever I send the job to start, it follows the line fine but the laser doesn't fire. It fires when the cut box is running but nothing for the start. I still have the voltmeter connected so I can tell thats its not outputting anything, and isn't just set too low. I'm off to search the rest of the forum for ideas.
Tim.
-
twosoc
- Posts: 90
- Joined: Fri Jun 29, 2012 2:13 pm
- Contact:
Re: Need help with getting setup properly. Solved!!!!!!!!
Hey I managed to get it working today, the problem was the corner power wasn't set properly, so it reverted back to 0.0% power. Silly me.
I still can't get the usb to work, but hey ho, its not too bad using the network cable. Its just a case of playing round with the settings to get a clean cut. Before the conversion I managed to cut 3mm mdf cleanly, I can't seem to do it now even with air assist without slowing down to 3 speed. Not too bad but when you want to cut an a4 sheet, it takes some time. I must admit that when I did the first sheet that engraved and cut in the same job, it did give me a warm feeling. :)The end result was worth the effort but boy was it stressful, but thanks to everyone that helped me out, Especially Walt, I really couldn't have done it without you guys. Hopefully I'll get some pics of some stuff I've managed to make. My drawings need a tweek now though, some of the lines are too close together and produce bits that are really fragile. Learning curve I suppose.
Thank you, thank you, thank you.
-
Things
- Posts: 96
- Joined: Sat Mar 17, 2012 7:08 pm
- Location: Cairns, Australia
- Contact:
Re: Need help with getting setup properly.
Great to hear it's working!
-
waltfl
- Posts: 674
- Joined: Thu Sep 08, 2011 5:29 am
- Contact:
Re: Need help with getting setup properly.
perfect congratulation!!
another success story
greetings
walt
another success story
greetings
walt
-
twosoc
- Posts: 90
- Joined: Fri Jun 29, 2012 2:13 pm
- Contact:
Re: Need help with getting setup properly.
Cheers Walt, I couldn't have done it without you.
One note though, I've read you shouldn't go above 20ma to save the tube, but on 100% power it only goes up to 15ma and holds steady is this normal? Or am I bottlenecking the power somewhere and doing myself out of some cutting power?
Cheers, Tim.
One note though, I've read you shouldn't go above 20ma to save the tube, but on 100% power it only goes up to 15ma and holds steady is this normal? Or am I bottlenecking the power somewhere and doing myself out of some cutting power?
Cheers, Tim.
-
waltfl
- Posts: 674
- Joined: Thu Sep 08, 2011 5:29 am
- Contact:
Re: Need help with getting setup properly.
Hi tim
very strange did you set the power to 98% and on TL-negative and connected the right connector on the PWM TL-negative?
how you measure the current mA? it goes between the negative from the tube and the negativ from the PWM.
do you have the potentimeter still in there?? usually the PWM can put out up to 28 to 30mA
greetings
walt
twosoc wrote:Cheers Walt, I couldn't have done it without you.
One note though, I've read you shouldn't go above 20ma to save the tube, but on 100% power it only goes up to 15ma and holds steady is this normal? Or am I bottlenecking the power somewhere and doing myself out of some cutting power?
Cheers, Tim.
-
twosoc
- Posts: 90
- Joined: Fri Jun 29, 2012 2:13 pm
- Contact:
Re: Need help with getting setup properly.
exactly like that Walt, but without the potentiometer. I'm just going to double check the connections now, maybe there's a loose wire, don't think so though. Still it works well as it is.  I've another meter on its way just to check that its not stuck at 15a.
-
Things
- Posts: 96
- Joined: Sat Mar 17, 2012 7:08 pm
- Location: Cairns, Australia
- Contact:
Re: Need help with getting setup properly.
15mA is a pretty standard value for a 40W tube, if that's what you're using. If you bought a decent "gold box" style PSU, then generally they are pretty good at limiting their own current to safe levels. It's the cheap boards out of the K40 machines etc that you need to keep an eye on.
-
waltfl
- Posts: 674
- Joined: Thu Sep 08, 2011 5:29 am
- Contact:
Re: Need help with getting setup properly.
Hi
no I got one of the best "gold box"PWM PSU from marco (lightobject) and this does not limiting the current level it can go up to 27mA.
thats why I can not go over 55% power this is the 17mA range.
greetings
walt
no I got one of the best "gold box"PWM PSU from marco (lightobject) and this does not limiting the current level it can go up to 27mA.
thats why I can not go over 55% power this is the 17mA range.
greetings
walt
Things wrote:15mA is a pretty standard value for a 40W tube, if that's what you're using. If you bought a decent "gold box" style PSU, then generally they are pretty good at limiting their own current to safe levels. It's the cheap boards out of the K40 machines etc that you need to keep an eye on.
-
twosoc
- Posts: 90
- Joined: Fri Jun 29, 2012 2:13 pm
- Contact:
Re: Need help with getting setup properly.
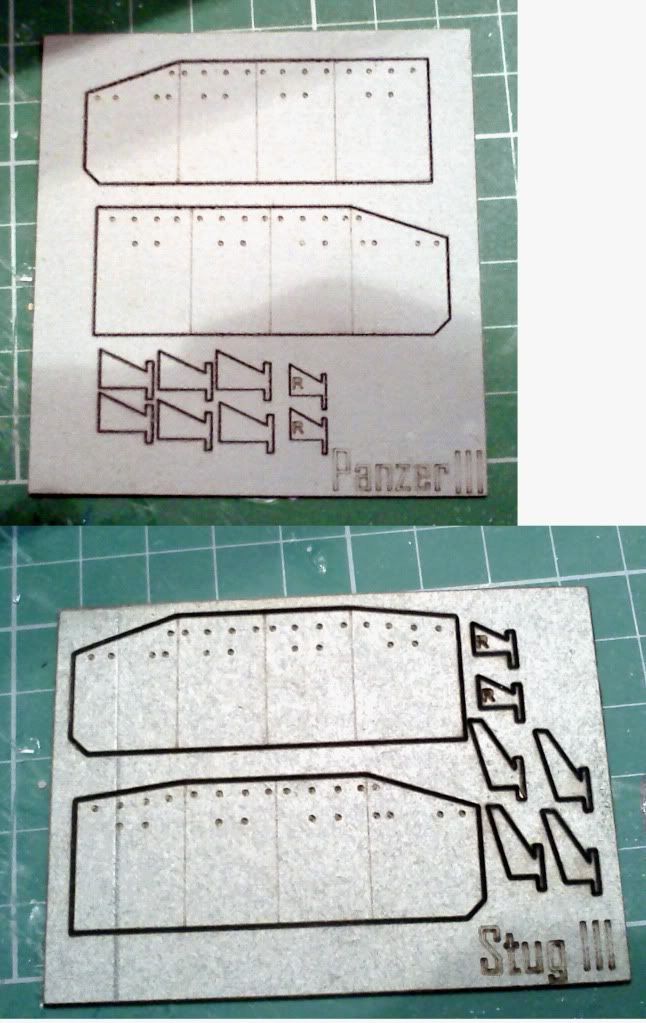
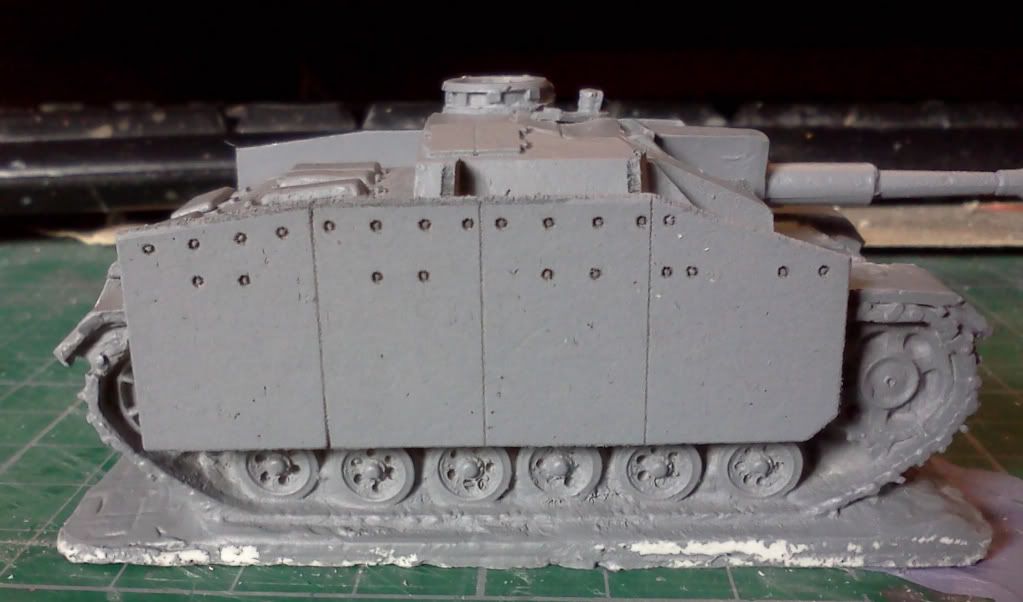
here's a couple of pics of what I managed to do today. they're for 1:72 scale WWII wargames. cut from 1mm mountboard at 40% power with air assist.
-
waltfl
- Posts: 674
- Joined: Thu Sep 08, 2011 5:29 am
- Contact:
Re: Need help with getting setup properly.
Hi my friend
sofar so good but the cutline is pretty wide what looks to me that you dont have the right distance lense to material and /or the beam is not exactly lined up.
greetings
walt
sofar so good but the cutline is pretty wide what looks to me that you dont have the right distance lense to material and /or the beam is not exactly lined up.
greetings
walt
twosoc wrote:here's a couple of pics of what I managed to do today. they're for 1:72 scale WWII wargames. cut from 1mm mountboard at 40% power with air assist.
-
twosoc
- Posts: 90
- Joined: Fri Jun 29, 2012 2:13 pm
- Contact:
Re: Need help with getting setup properly.
yeah its a bit wider than I was expecting, I think my first mirror is slightly tilted to be honest as it keeps changing from job to job so I think its shifting slightly. I'll have to cut a spacer to hold it firmly. It definitely needs realigning now as the right hand side of the cut isn't as deep anymore.
the first to second mirror seems to be a little larger than before, new tube perhaps?the burn on the second mirror seems to be about 3-4mm wide ish. How do you work out the ideal focus length? Do you want it at the top of the work sheet or halfway through as I've read elsewhere?
the first to second mirror seems to be a little larger than before, new tube perhaps?the burn on the second mirror seems to be about 3-4mm wide ish. How do you work out the ideal focus length? Do you want it at the top of the work sheet or halfway through as I've read elsewhere?
-
waltfl
- Posts: 674
- Joined: Thu Sep 08, 2011 5:29 am
- Contact:
Re: Need help with getting setup properly.
hi there
do you know how to adjust the beam?? I just attached the picture how to adjust I hope this helps.
the best focus lenght you need to find it the best and easiest way is to take a pice of scrap full lenght and put under the right side a piece about 1/2 inch the cut a line and see where it cuts all the way thru and has the smalest cut line
greetings
walt
twosoc wrote:yeah its a bit wider than I was expecting, I think my first mirror is slightly tilted to be honest as it keeps changing from job to job so I think its shifting slightly. I'll have to cut a spacer to hold it firmly. It definitely needs realigning now as the right hand side of the cut isn't as deep anymore.
the first to second mirror seems to be a little larger than before, new tube perhaps?the burn on the second mirror seems to be about 3-4mm wide ish. How do you work out the ideal focus length? Do you want it at the top of the work sheet or halfway through as I've read elsewhere?
- Attachments
-
-
-
-
-
-
-
-
-
-
-
-
-
Who is online
Users browsing this forum: No registered users and 33 guests